Build and deploy apps in minutes with streamlit
Another productive weekend passed by, learning the extremely powerful yet simple web app builder - Streamlit.
Streamlit is a python based framework that reduces the effort of building and deploying web apps to almost writing a markdown document. It is extremely fast. And you can use it as a debugger tool. You can pretty much print anything out in the window and automatically formats it for you. Put simply, Streamlit is awesome!
The video from streamlit is all you need to understand. To code it, please continue reading... :)
Let's go over it more formally by looking at an example.
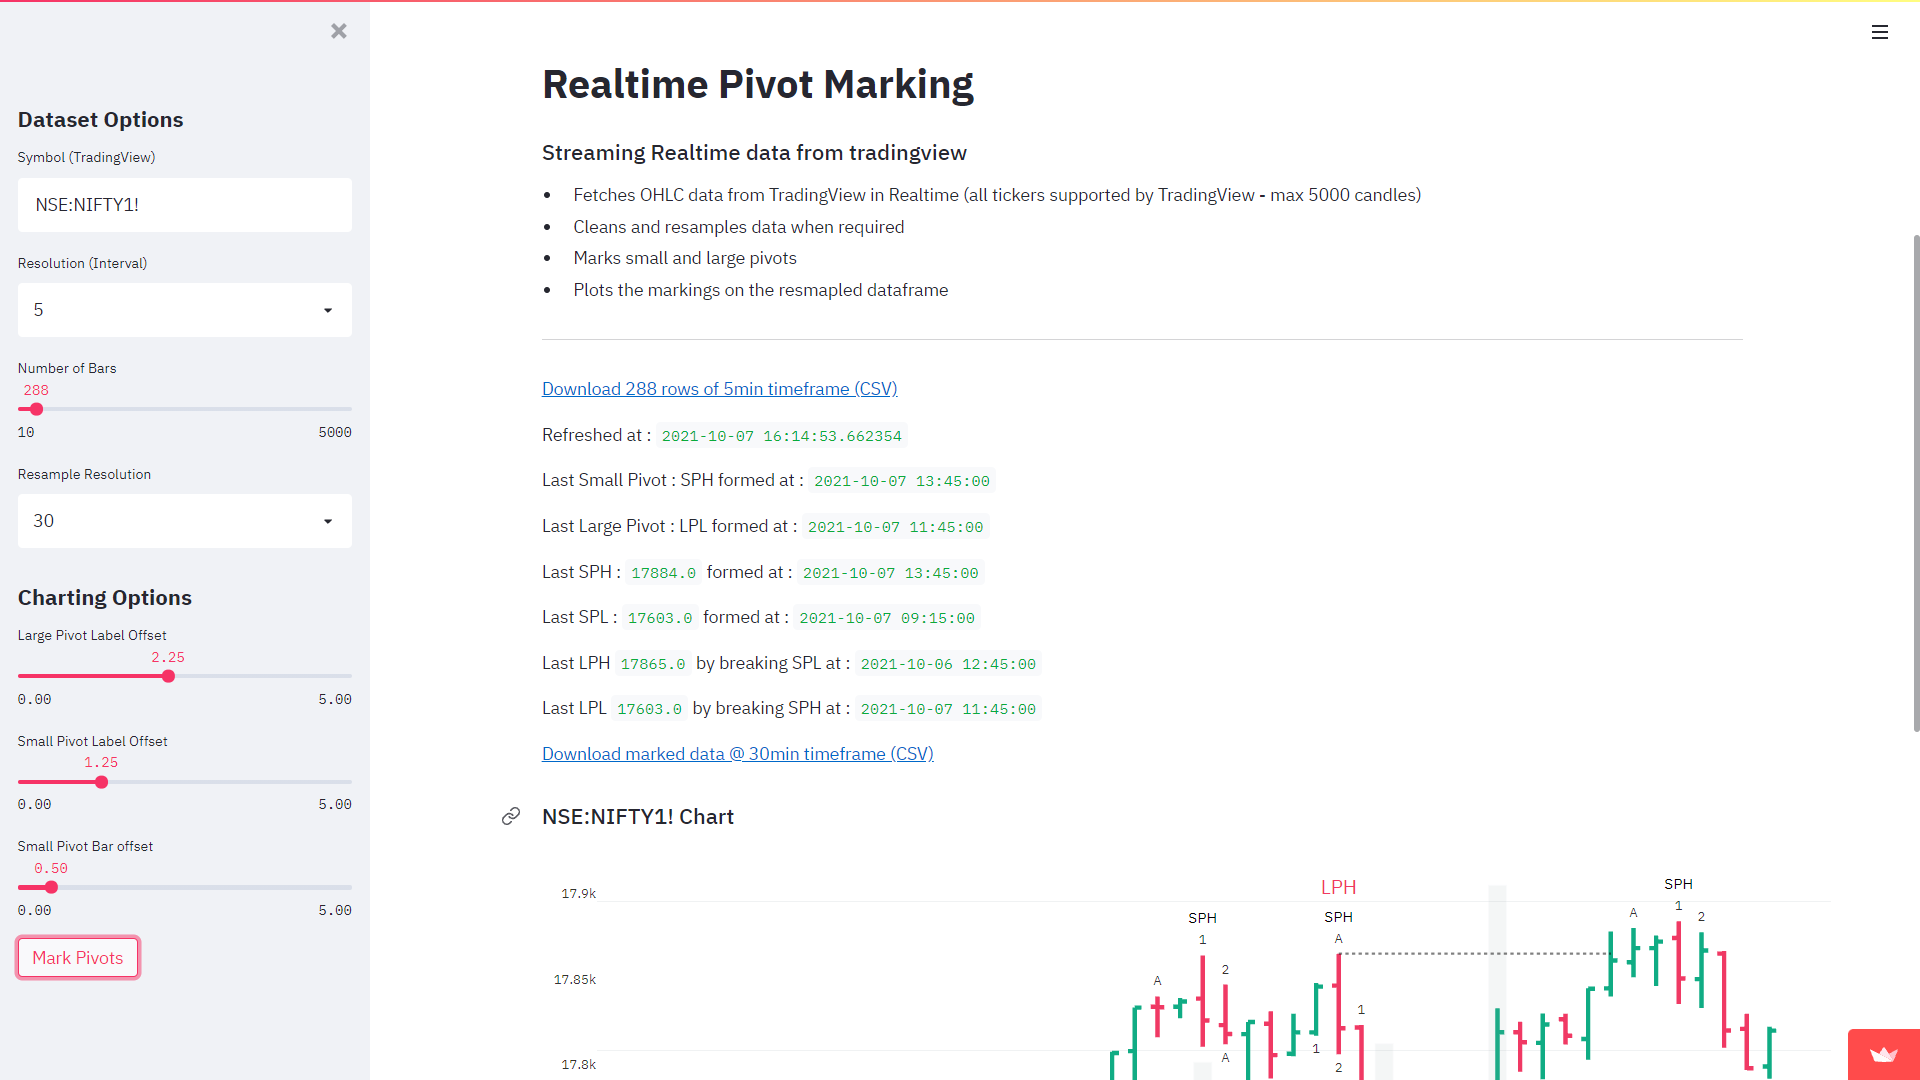
This is how the app looks like. You get a side bar and a main page. In the main page you can print out the headings, bullet points and your favorite chart. You can keep the sidebar for controls. This works typically like a website with a touch of Python to make it more interactive. This is how I went about building it.
- Installing Streamlit
- Writing content
- Publishing code to Github Repo
- Deploying the app in seconds
Let's go through each step one by one.
1. Installing Streamlit
Before installing streamlit, it is good idea to set up a virutal environment. You can then export the same requirements in requirements.txt file to let streamlit know about the packages you are trying to use while deploying. I use conda to install and manage packages
conda create -n myappenv python=3.9 # create environment
conda activate myappenv # activate environment
To leave the virtual environment, you can use conda deactivate
Now the environment is set up. You can install streamlit and required dependencies using pip install streamlit
To test it out, create an empty python file, say, test.py, and write streamlit run test.py in the console to run a streamlit server. This will open up your default browser window, where you can see the streamlit server running. Once you make any changes to the test.py document and hit ctrl+s, it will automatically refresh the contents of the page (It prompts during the first change whether you want to rerun once or always - I use Rerun always). Yes. That easy!
2. Writing content to test.py
Next you need to import streamlit by using import streamtlit as st
Use st.write for main content
This step will look more like writing a markdown document. To format anything within the streamlit web page, you need to write content within st.write(''). For example to create headings and some bullet text you only need to write...
import streamlit as st
st.write('''
# Heading or H1
## Subheading or H2
* Bullet 1
* Bullet 2
* Bullet 3
* Bullet 4
''')
Use st.sidebar.write for sidebar content
Okay. This is easy, but what about side bar. For this, you only need to use st.sidebar.write(''), and that will push the content to the sidebar
Widgets
You can use multiple widgets within streamlit, all available within one line of code. For example to use a slider, all you need to call is st.slider(). You can connect the input of the slider to a st.write() content which will update automatically once you move the slider.
import streamlit as st
x = st.slider('x')  # 👈 this is a widget
st.write(x, 'squared is', x * x)
Not getting too much in detail, here is a link to explore widgets, streamlit themselves have done a better job of explaining.
Other features
You can also print tables out using st.table(), interaactive plotly charts using st.plotly_chart() and images using st.image(). More details in this documentation
3. Publishing code to Github Repo
Once you are done with you app that you want to deploy, it's time to push it to Github. For that, follow these steps
- Go to github.com and create a new repository. To avoid errors don't initialize with README and `gitignore`
- Head to the remote location on you PC or mac
- Git bash in the directory of project files
- Initialize using
git init - Add files using
git add . - Commit -
git commit -m "First commit" - At the top of your Github repository's Quick Setup page, click to copy the remote repository URL
- Add origin -
git remote add origin REMOTE_URL - Verify origin -
git remote -v - Push to origin -
git push origin master
4. Deploying the app
My favorite part!!! For deploying your app you only need to click deploy in you streamlit app and it open page in browser that looks like this...

You only need to mention three things from your public github repo
- Your Repo URL
- Branch Name (master)
- Main File (test.py)
...and hit deploy!!! If this does not surprise you, I don't know what will. All the heavy lifting of deployment is taken care of for you, like a butler at your service.
Your deployed app can be found at
https://share.streamlit.io/[user name]/[repo name]/[branch name]/[app path]
By this point, I think you are already bored with the constant rant of me trying to convince you that streamlit is awesome. This is one of the most simple tools to build and deploy any kind of app that you want. It literally takes a lot of burden off from your shoulders. If you are not convinced, Just try deploying using any other framework, like dash by Plotly
Thank you for reading! Hope you liked it!